How to Crochet a Doll: A Complete Guide for Beginners
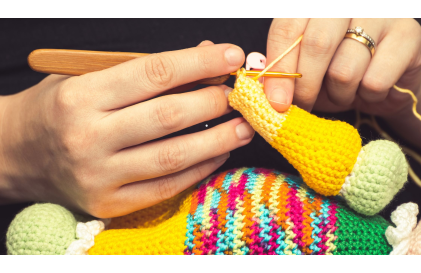
Crocheting a doll is a fun and rewarding craft project that allows you to create adorable, personalized keepsakes. Whether you're a seasoned crocheter or just starting out, making a crochet doll is a wonderful way to bring your creativity to life. In this guide, we'll take you through everything you need to know to crochet a doll, from selecting the right yarn and tools to creating the perfect design. Let’s dive into the magical world of crochet dolls!
Why Crochet a Doll?
Before we get into the details, you might be wondering why you should crochet a doll. Here are a few great reasons:
- Personalized Gifts: Handmade crochet dolls make unique and thoughtful gifts for loved ones. You can customize them to resemble the recipient, making it a truly special present.
- Creative Expression: Crocheting a doll lets you unleash your creativity. You get to decide everything — from the hair color and clothing style to accessories and facial expressions.
- Therapeutic Hobby: Crocheting is a relaxing and therapeutic activity that can help reduce stress. The repetitive motion of crocheting is soothing and can be a great way to unwind after a busy day.
What You Need to Get Started
To crochet a doll, you will need a few basic supplies. Here’s a list of materials to gather before you start your project:
- Yarn: Choose a soft, medium-weight yarn. Cotton yarn is a great choice because it’s durable and has a smooth finish. Pick skin-tone shades for the body and bright colors for the clothes.
- Crochet Hook: A size 2.5mm to 3.5mm hook is usually ideal for crocheting dolls, but this may vary depending on your yarn.
- Stuffing: Use polyester fiberfill stuffing to give your doll a soft, plush feel.
- Stitch Markers: These help you keep track of where you are in your pattern, especially for beginners.
- Tapestry Needle: This is used to sew parts of the doll together and to weave in yarn ends.
- Safety Eyes or Embroidery Floss: Safety eyes give the doll a professional look, while embroidery floss can be used to sew facial features if you prefer a handmade touch.
- Scissors: For cutting yarn and thread.
Basic Stitches You Need to Know
If you’re new to crocheting, you’ll need to learn a few basic stitches before you can crochet a doll. The good news is that dolls mainly use simple stitches like the single crochet (SC), slip stitch (SL ST), and double crochet (DC). Here’s a quick refresher:
- Single Crochet (SC): Insert your hook into the stitch, yarn over, pull through, yarn over again, and pull through both loops on the hook.
- Slip Stitch (SL ST): Insert your hook into the stitch, yarn over, and pull through both the stitch and the loop on your hook.
- Double Crochet (DC): Yarn over, insert your hook into the stitch, yarn over again, pull through, yarn over, pull through two loops, yarn over, and pull through the remaining two loops.
These stitches form the foundation of most crochet doll patterns.
Step-by-Step Guide to Crochet a Doll
Let’s go through a simple pattern to crochet a basic doll. This guide will take you through making the head, body, arms, legs, and assembling the doll.
Step 1: Crochet the Head
The head is usually a sphere made using a series of increasing and decreasing stitches.
- Magic Ring: Start with a magic ring (or adjustable ring) and make 6 single crochets (SC) into the ring.
- Increase Round: Increase each stitch by doing 2 SC in each stitch around (12 stitches).
- Continue Increasing: Keep increasing evenly in each round until you reach around 36 stitches.
- Single Crochet for 5-6 Rounds: This will create the shape of the head.
- Decrease: Start decreasing by making 1 SC in every second stitch. Once you’re left with 6 stitches, fasten off.
Step 2: Crochet the Body
The body is crocheted in a similar fashion to the head but elongated.
- Magic Ring: Start with a magic ring and make 6 SC.
- Increase to 24-30 Stitches: Increase evenly in each round until you reach about 24-30 stitches.
- Crochet Evenly for 10-12 Rounds: This forms the torso of the doll.
- Decrease: Start decreasing to shape the waist. Once you reach 12 stitches, fasten off.
Step 3: Crochet the Arms and Legs
The arms and legs are typically worked in rounds and are similar in structure.
- Magic Ring for Each Limb: Start with a magic ring and make 6 SC.
- Increase and Crochet Evenly: Increase to about 12 stitches and then crochet evenly for 10-15 rounds depending on the desired length.
- Stuff and Fasten Off: Lightly stuff the arms and legs with fiberfill and fasten off.
Step 4: Assemble the Doll
Now that you have all the parts, it’s time to assemble the doll.
- Attach the Head to the Body: Use a tapestry needle to sew the head onto the body securely.
- Sew on the Arms and Legs: Attach the arms and legs using a whip stitch.
- Add Stuffing as Needed: Make sure the doll is evenly stuffed, and add more fiberfill if necessary.
Step 5: Add Facial Features and Hair
This is where you can get creative and give your doll personality.
- Eyes: You can use safety eyes or embroider them with black thread.
- Mouth: Use pink or red embroidery floss to stitch a small smile.
- Hair: To add hair, use yarn and loop it through the stitches on the head. You can make it long or short, curly or straight — it’s up to you!
Step 6: Crochet Clothes for Your Doll
Crocheting clothes is optional, but it adds a nice finishing touch. You can create simple dresses, pants, or shirts using basic crochet stitches.
Tips for Crocheting a Doll
- Use Tight Stitches: This prevents stuffing from showing through the gaps.
- Choose the Right Yarn: For beginners, choose a yarn that is easy to work with and doesn’t split.
- Use Stitch Markers: These are lifesavers, especially when working in rounds.
- Experiment with Colors: Don’t be afraid to mix and match yarn colors for a unique look.
- Practice Patience: Crocheting a doll can be time-consuming, but the end result is worth it.
Customizing Your Crochet Doll
One of the best things about crocheting dolls is that you can customize them however you like. Here are some fun ideas for customization:
- Add Accessories: Create tiny hats, scarves, or even a little handbag.
- Experiment with Hairstyles: Try braids, buns, or curly hair for different looks.
- Create a Theme: Make your doll into a character, like a superhero, princess, or animal-themed friend.
- Use Different Textures: Mix different yarn textures for the clothes and hair for added interest.
Frequently Asked Questions
Q: How long does it take to crochet a doll? A: The time varies based on the complexity of the pattern and your skill level. On average, a simple doll might take anywhere from 6 to 10 hours.
Q: What’s the best yarn for crocheting dolls? A: Cotton yarn is often recommended because it’s durable, doesn’t fray easily, and gives a nice, neat finish.
Q: Can I crochet a doll if I’m a beginner? A: Absolutely! Start with a simple pattern and basic stitches. As you gain confidence, you can try more intricate designs.
Conclusion
Crocheting a doll is a delightful and rewarding project that allows you to create a handmade, personalized toy that can be treasured for years. Whether you’re making it as a gift or keeping it for yourself, the process is filled with creativity and joy. So, grab your hook and yarn, and start crocheting your own adorable doll today!


La sicurezza e la correttezza sono le mie fissazioni.<br>Indago le licenze, la crittografia e l'equità dei giochi di <br><a href="https://www.altopianodelsole.it/casino/betonred/">Betonred</a> per garantirvi un ambiente affidabile.